Get started (with CLI)
Fluence CLI is your one-stop command line interface (CLI) shop to creating, deploying, paying, running, monitoring and removing distributed services to and from the Fluence peer-to-peer network.
👉 Note that Fluence CLI is currently only available for nix systems including OSX and Windows Subsystem for Linux (WSL). Moreover, Fluence CLI installs all the required dependencies not already installed on your system including Rust.
From scaffolding your project, services and modules to Deal creation and service deployment, Fluence CLI has you covered. Moreover, Fluence CLI can scaffold JS projects using js-client allowing you integrate Fluence CLI projects in the browser or node app. See Figure 1 for a quick overview of workflows managed by Fluence CLI and the associated commands. If you have Fluence CLI installed, use fluence --help to get a more complete overview of topics and commands.
Figure 1: Stylized Project Creation And Deployment Workflow With Fluence CLI
mermaid
    stateDiagram

    [*] --> InitProject: fluence init
    InitProject --> CreateNewService: fluence service new
    InitProject --> AddExistingService: fluence service add
    CreateNewService --> Service
    AddExistingService --> Service
    Service --> AddNewModules: fluence module new
    Service --> AddExistingModules: fluence module add
    Service --> LocalTesting: fluence service repl, cargo test
    Service --> DeployedService: fluence deal deploy
    DeployedService --> RunService: fluence run
Fluence CLI uses multiple yaml config files and you can find their schemas in the .fluence/schemas directory. Note that Fluence CLI creates config files lazily, i.e., as needed, and at project initialization time not all config files exist. For more information, see the Fluence CLI Readme.
Install Fluence CLI
Fluence CLI is available as a package providing it's own copy of NodeJS and NPM for better portability.
Preferred installation method is through the Installation Script. It will install a self-suficient fcli package that won't depend nor touch your system NodeJS toolchain.
- Script: default
- NPM: advanced
The easiest and least error-prone way:
curl -qL https://raw.githubusercontent.com/fluencelabs/cli/main/install.sh | bash
Alternative and more advanced option is to install via NPM. NodeJS must be >= 18.
npm -g install @fluencelabs/cli@latest
We can check our installation success (note that your cli and node versions might be different):
Start a new project
As mentioned at the outset, Fluence CLI is your Swiss army knife to handle all things Fluence. To keep things familiar, let’s start with the obligatory Hello World example to introduce Fluence and Fluence CLI.
We scaffold a new project with fluence init , which gives us a couple scaffolding choices:
Choose the minimal scaffolding option, and press return. When prompted, enter hello_world as the project path.
bash
bash
Also, we can choose across different networks to deploy our services. For now, we will use the default network, which is kras:
Change into your new hello-world directory and have a look around:
bash
bash
A this point, you see various config (yaml) files and a src/aqua dir with a main.aqua file that contains a variety of Aqua code examples and the most common dependency imports.
It defines several important functions:
showSubnet– a function that resolves subnet participants by DealID stored in.fluence, and shows a list of workers.runDeployedServices– a function that resolves subnet, and then callsMyService.greetingon every worker that participates in your subnet.
runDeployedServices is going to be commented out in minimal template, and uncommented in quickstart template. It serves as an example of how to call functions on a subnet with multiple workers.
For more information about all things Aqua, see the Aqua book.
Scaffolding Options
Instead of the minimal scaffold chosen at the outset of this section, we can opt for an extended project setup for either Typescript, Javascript or a quickstart.
The TS/JS, setup, on the other hand, provides you with the scaffolding to create a client peer with Fluence js-client that can run in the browser or as a node app. See Table 1.
Table 1: Client peer options from scaffolding
| Use-case | Client Provider | |
|---|---|---|
| minimal | Start from scratch, call functions from terminal | Fluence CLI |
| quickstart | Start with a pre-defined service, call functions from terminal | Fluence CLI |
| TS | Build TypeScript front-end application | Browser |
| JS | Build JavaScript front-end application | Node App |
Write code
After project initialization, it's time to write some code!
Let's create a simple hello_world function, which will look like this:
rust
rust
But we don't yet have a place to put that code. For that, we need to create a Service by using command fluence service new.
Create a new service
Let’s unbundle this command before we follow the prompts: As discussed earlier, you write your business logic in Rust and compile it to one or more Wasm modules. You then “package” these modules, with help of Fluence CLI, into a service. Eventually you deploy this service to one or more providers and use Aqua to interact with the deployed service(s).
If your business logic results in only a single module, like our hello_world code, then you will have a service with a single module.
Now let’s use Fluence CLI to scaffold our Rust service.
Follow the prompts and complete the setup:
bash
bash
So what just happened?
We instructed the CLI to create a service hello-world in which we want our hello_world module to live. Moreover, we chose to add this information to the project’s main configuration file fluence.yaml.
Here's how fluence.yml looks now.
yaml
yaml
Let's see what this means for our hello_world service.
- The service is configured to be at
src/services/hello_world. Path is relative tofluence.yml. - A Deal with name
dealNameis defined - The service
hello_worldis included in the DealdealName
As a result, when you fluence deal deploy, it will deploy hello_world as a part of the dealName Deal. We will go into the details of deal deploy in the next part of this tutorial.
Let's take a look at the directory structure to see how Fluence CLI scaffolded our Rust (sub-)project:
bash
bash
Recall, a service is comprised of one or more Wasm modules and associated configuration and each module, such as hello_world, has its own module.yaml which contains all the info necessary to identify the module as well as any host resource dependencies. service.yaml contains the service name and a list of the modules comprising the service including the entry, aka facade, module into the service.
Now, lets open main.rs file, and replace it's code with the following:
rust
rust
Code review
Let's review the code.
-
Before anything, we need to import the Marine Rust SDK, which allows us to compile Rust code to wasm32-wasi module compatible with Fluence’s Marine runtime.
-
Defines a
Hellostructure that will hold our greeting message. We could also use just-> Stringbut that wouldn't have allowed us to introduce the marine struct concept:#[marine]macro marks a struct as publicly visible, and handles serialization/deserialization for you. It is part of the marine-rust-sdk. -
Implements the
mainfunction which is responsible for the initialization logic of the module. It is called automatically at service instantiation. -
#[marine]markshello_worldas publicly visible, so it can be called from Aqua. -
The
hello_worldbody implements our business logic.
We discuss modules and module configuration further below. Also note that WASM IT has type limits, which are explained in detail in the Marine book. The short version is: you got strings, ints, floats, bytes, arrays and records at your disposal, but you do not have generics, lifetimes, etc.
Build project
With our code in place, let’s finally build our project, i.e. compile our code to a wasm32-wasi module. In your project root directory:
shell
shell
Depending on your setup, this may take a while as Fluence CLI will attempt to install missing dependencies, including Rust.
In the end, you can locate our much anticipated Wasm module in the Rust target compile directory:
bash
bash
Test our code
Before we deploy our code to the network, we may want to run some tests.
One way to interact with our Wasm module is to use the Marine Repl, which is a tool to run our Wasm modules locally as if they were deployed to the network.
Again, depending on your setup, this may take a while as Fluence CLI may need to install missing dependencies:
bash
bash
Note that we provided the name of the path to our service and thanks to the information in the fluence.yaml, service.yaml and module.yaml files, the CLI is able to resolve our input and load the REPL with the correct configuration. For help with the REPL, just type help and to list public structs and functions, type i :
bash
bash
As expected, our only public function is the hello_world function in the hello_world namespace. In order to run hello_world we use the cll command follow by the namespace, the function and the function arguments:
bash
bash
Well done!
An alternative to interactively test a module in the REPL, is to write unit and integration tests for our code. Rust comes with a very nice testing framework widely used to unit and integration test Rust code. However, we don’t necessarily want to test our Rust code but our Wasm modules. With the marine rust test dsk, you can do that!
To exit Marine REPL, enter q and hit Enter.
Unit tests
Let’s add the testing code for our hello-world module in our main.rs file:
rust
rust
Marine tests fundamentally follows cargo test with the exception that you are testing the Wasm modules not the code to be compiled to a Wasm module.
- In order to make that work, you need to use the marine-rs-sdk (1).
- Then, we need to provide the path to Config.toml (2).
- Finally, we need to tap into the Wasm module namespace to be able to call the desired method (3).
Once the test code is in place. you are ready to run cargo test :
bash
bash
All is well with our module!
Now it's time to break the test to see if it will catch a bug. Let's intentionally change the expected value to a different one:
Now, run cargo test again:
bash
bash
Now, let's say our test is correct, but our WASM/Rust implementation is wrong. Let's fix the code!
Change the response in hello_world function like this:
rust
rust
And run fluence build to rebuild the WASM modules. Without an explicit rebuild, tests will use old WASM modules, because cargo doesn't know anything about Fluence CLI and its setup.
After fluence build, re-run cargo test --workspace and voila, all is well again!
Now, before we're ready to move on to Deployment, let's go through Wallet setup and get tokens necessary for the Deployments.
Prepare your Wallet
In addition to Fluence CLI, you need a WalletConnect compatible wallet, such as MetaMask, to be able to fund the hosting and execution of your distributed services with (testnet) USDC.
Resources:
Adding Mumbai Testnet to MetaMask
1. Open MetaMask and click on the network menu at the top and select "Add Network".
The Mumbai network that automatically pops up in the list of networks is mainnet; we'll be adding the Mumbai testnet.
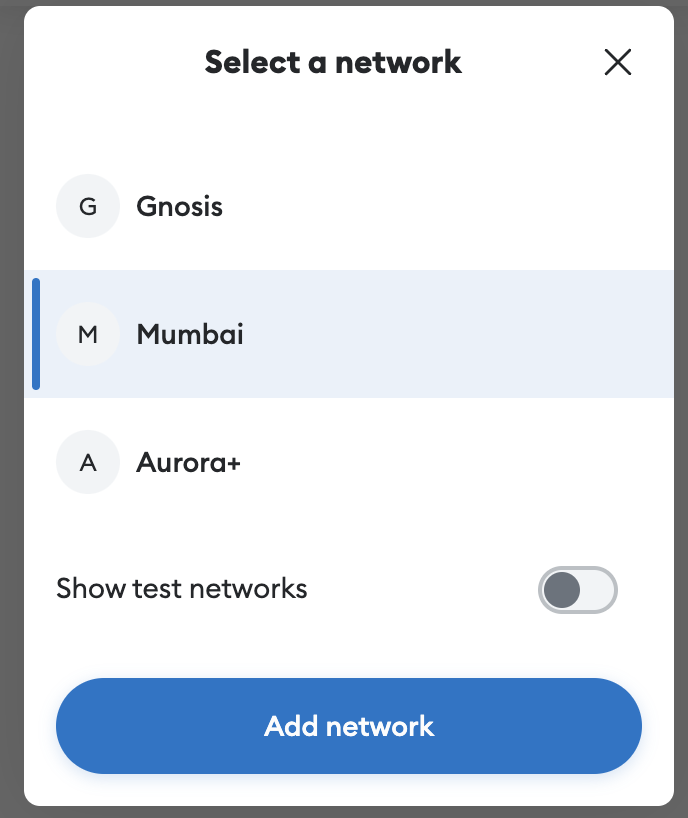
Figure 1: Add Network on MetaMask
2. Scroll down and click on "Add a network manually"
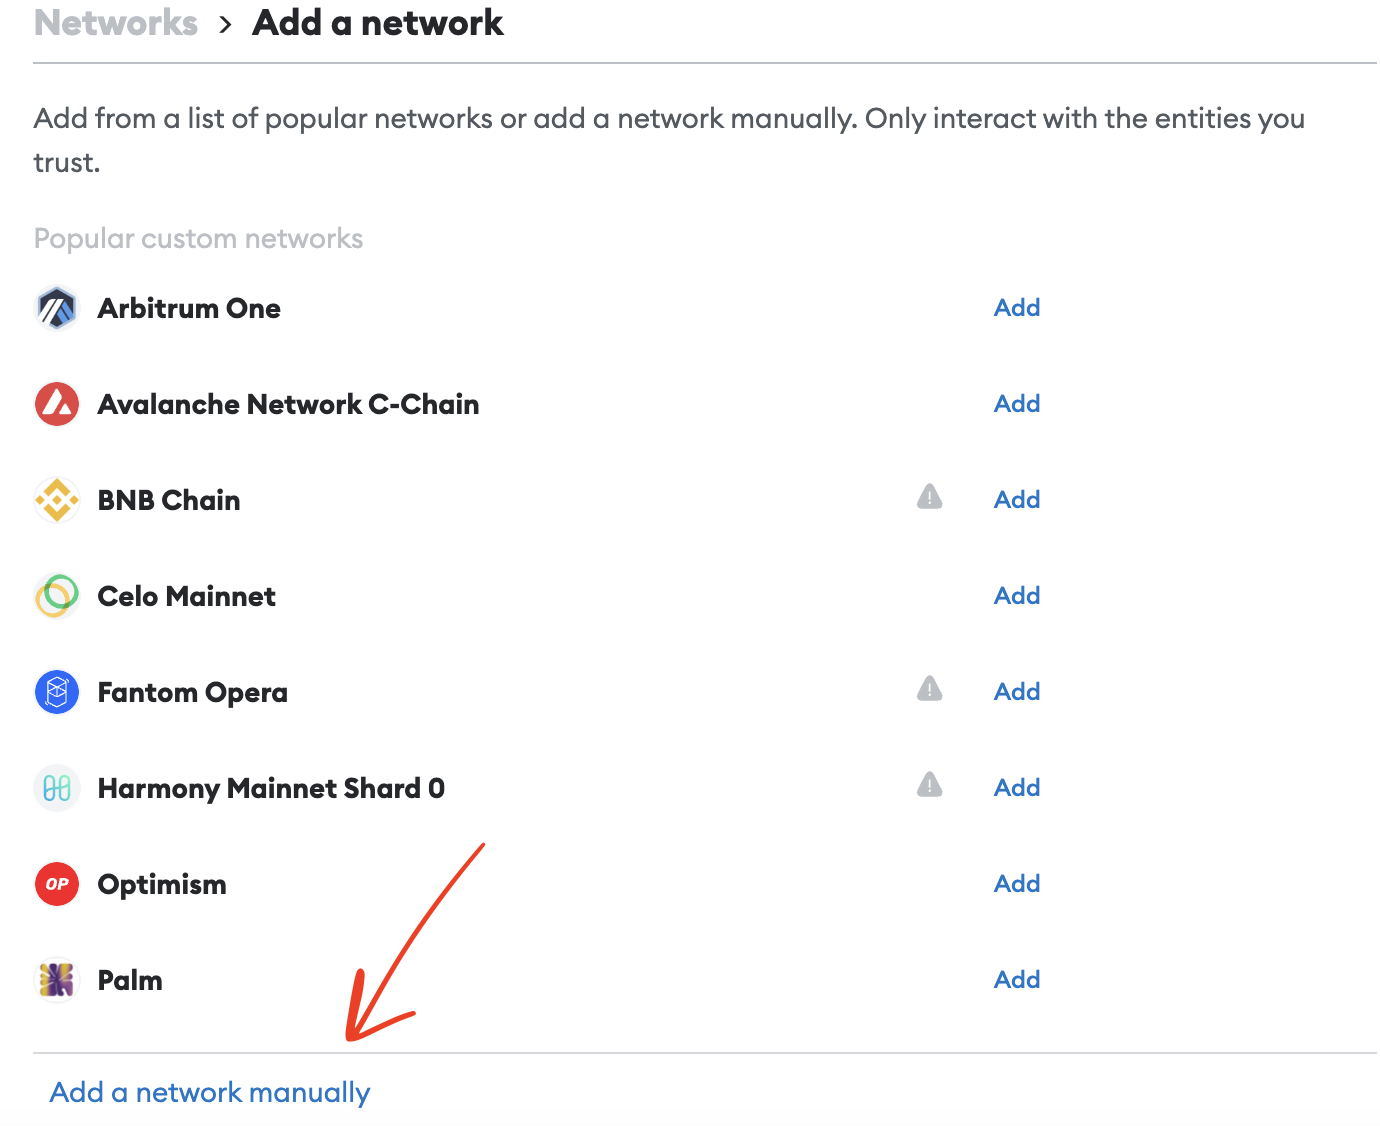
Figure 2: Add Manual Network on MetaMask
3. Fill in the following information and click "Save"
- Network Name: Mumbai Testnet
- New RPC URL: https://polygon-mumbai-bor.publicnode.com
- Chain ID: 80001
- Symbol: MATIC
- Block Explorer URL: https://mumbai.polygonscan.com
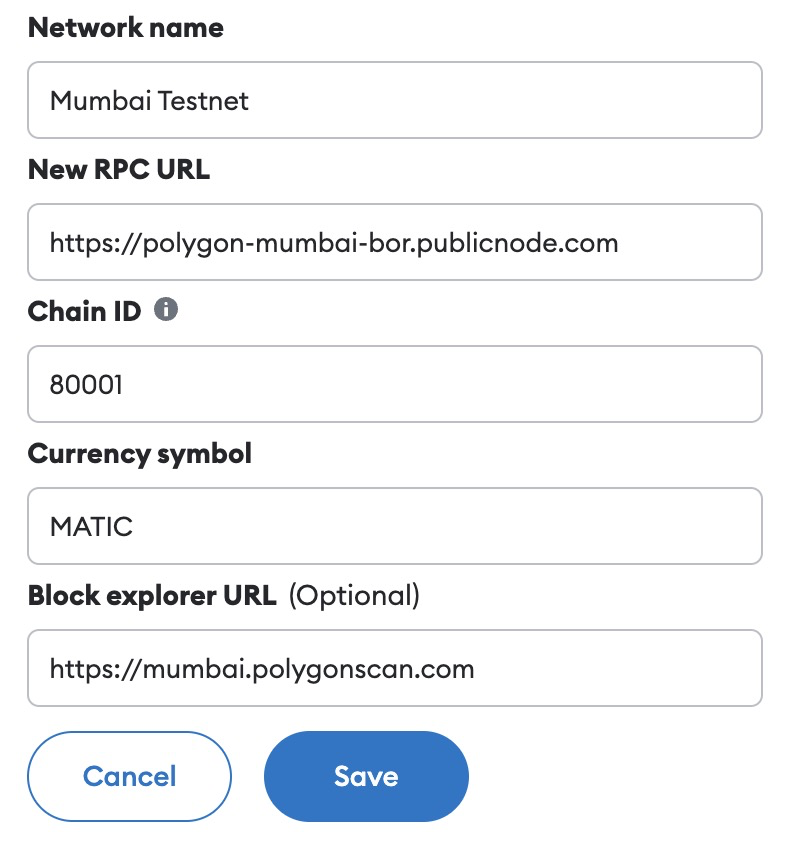
Figure 3: Populate Mumbai Testnet Information on MetaMask
Requesting MATIC Tokens from Polygon Testnet Faucet
1. Head over to the Mumbai Faucet
2. Connect through Dicsord and paste your wallet address
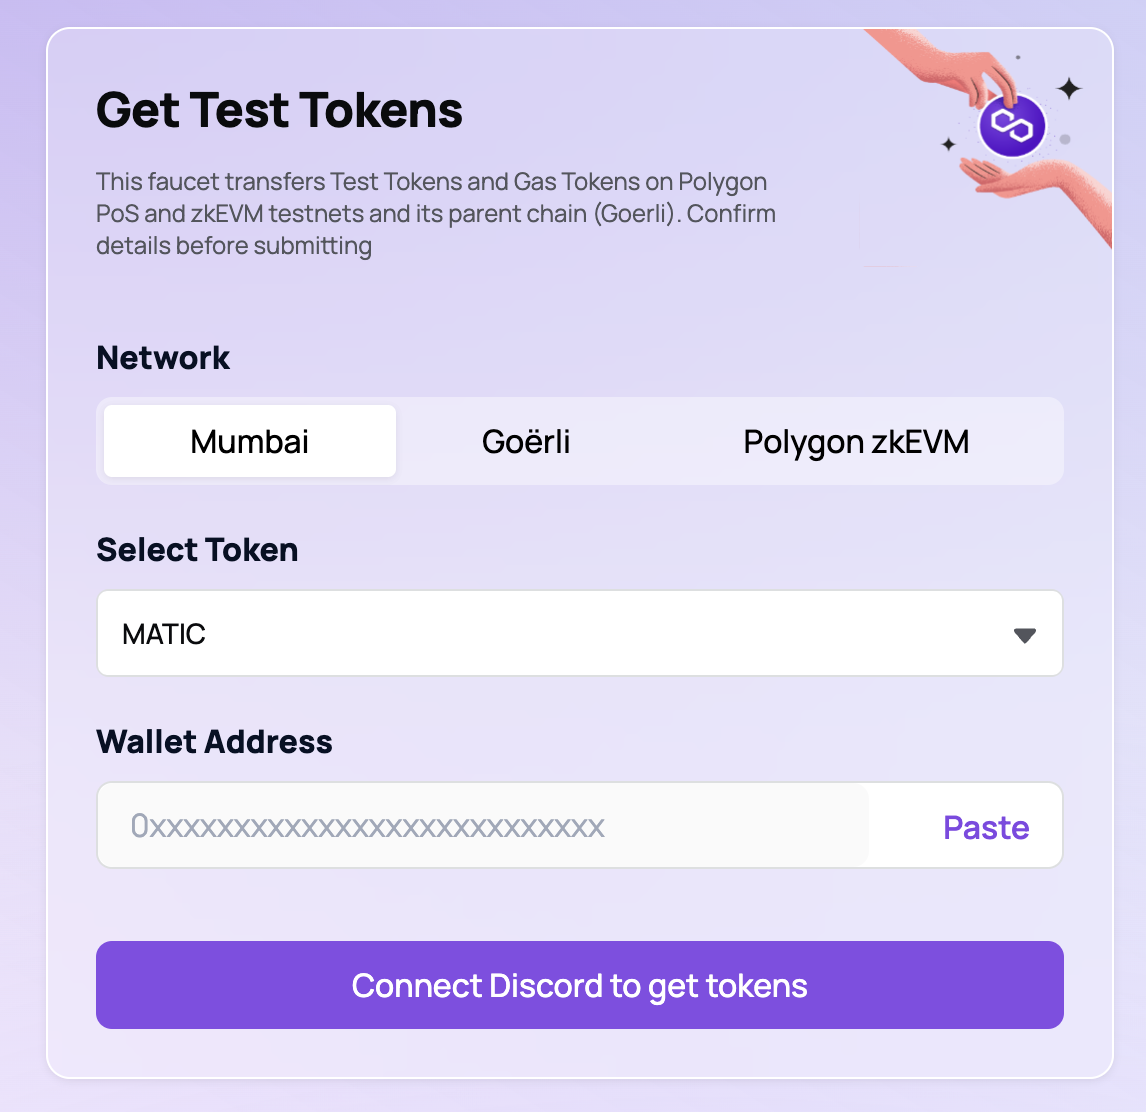
Figure 4: Request Mumbai Matic tokens from Polygon Testnet Faucet
3. Check your account to confirm that you have received the requested tokens

Figure 5: MetaMask wallet with MATIC balance
Finally, head over to the Fluence faucet, located here.
Fluence Faucet
1. Head over to the Fluence faucet
2. Click the "Login" button at the centre of the page
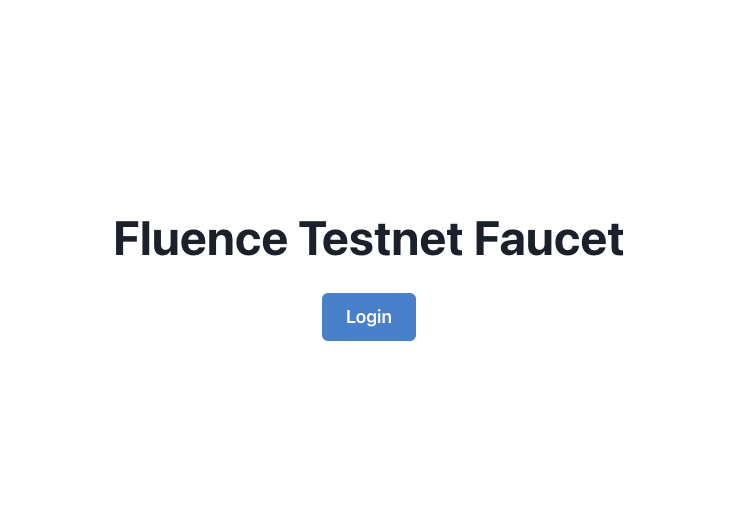
Figure 6: Login into the Fluence Interface
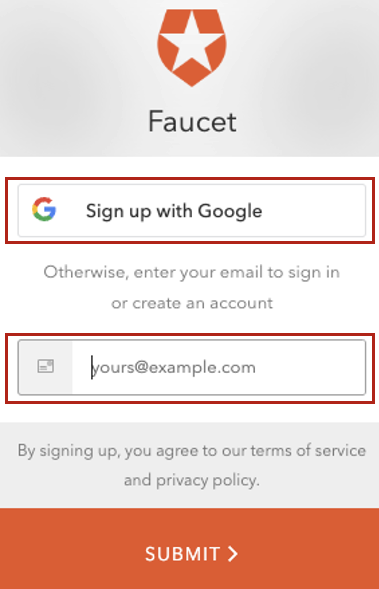
Figure 7: Create an account or Login
3. After logging in, click on the "Add tUSDC to metamask" button
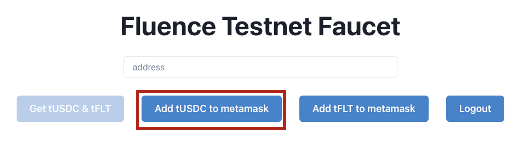
Figure 8: Fluence Interface for Adding tUSDC to Account
MetaMask will automatically populate the token symbol and decimals of precision fields.

Figure 9: Adding Suggested tUSDC Token on MetaMask
4. Verify that you've successfully added tUSDC to your account
Figure 10: Verify Addition of tUSDC on MetaMask
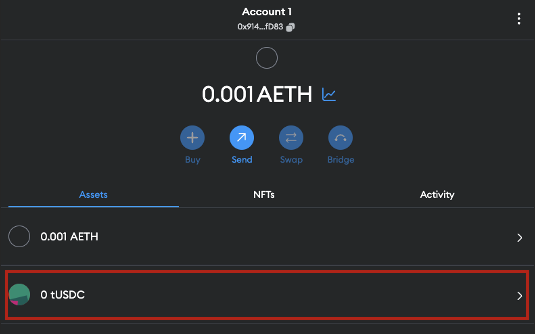
Figure 11: Confirm tUSDC Addition to Account
5. Navigate back to the Fluence Faucet. In the "Token Contract Address" field, enter your account address and click "Get tUSDC"
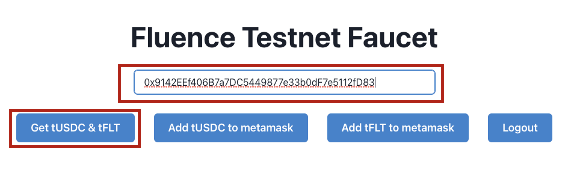
Figure 12: Request tUSDC using Account Address
The faucet will confirm the transfer with the following information:
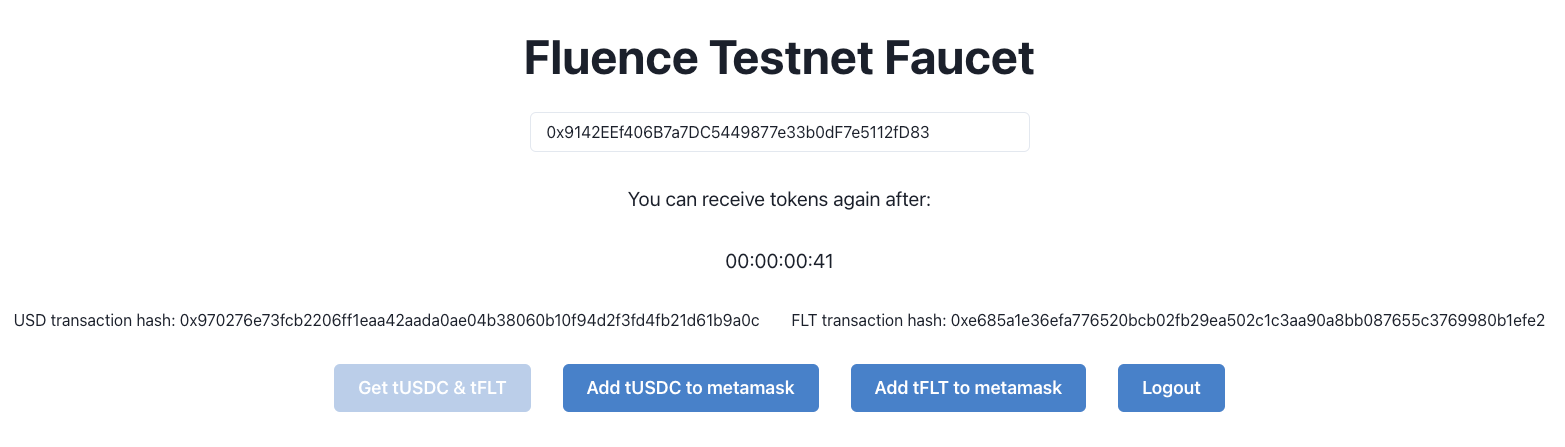
Figure 13: Metadata for tUSDC Faucet Transfer
6. Confirm the tUSDC tokens were received.
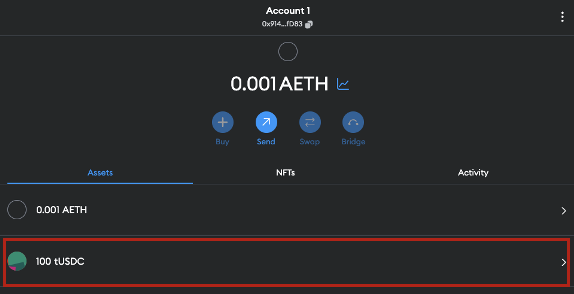
Figure 14: Check tUSDC Account Balance
7. To see the transaction data info for both MATIC and tUSDC transfers into your account, head over to the explorer.
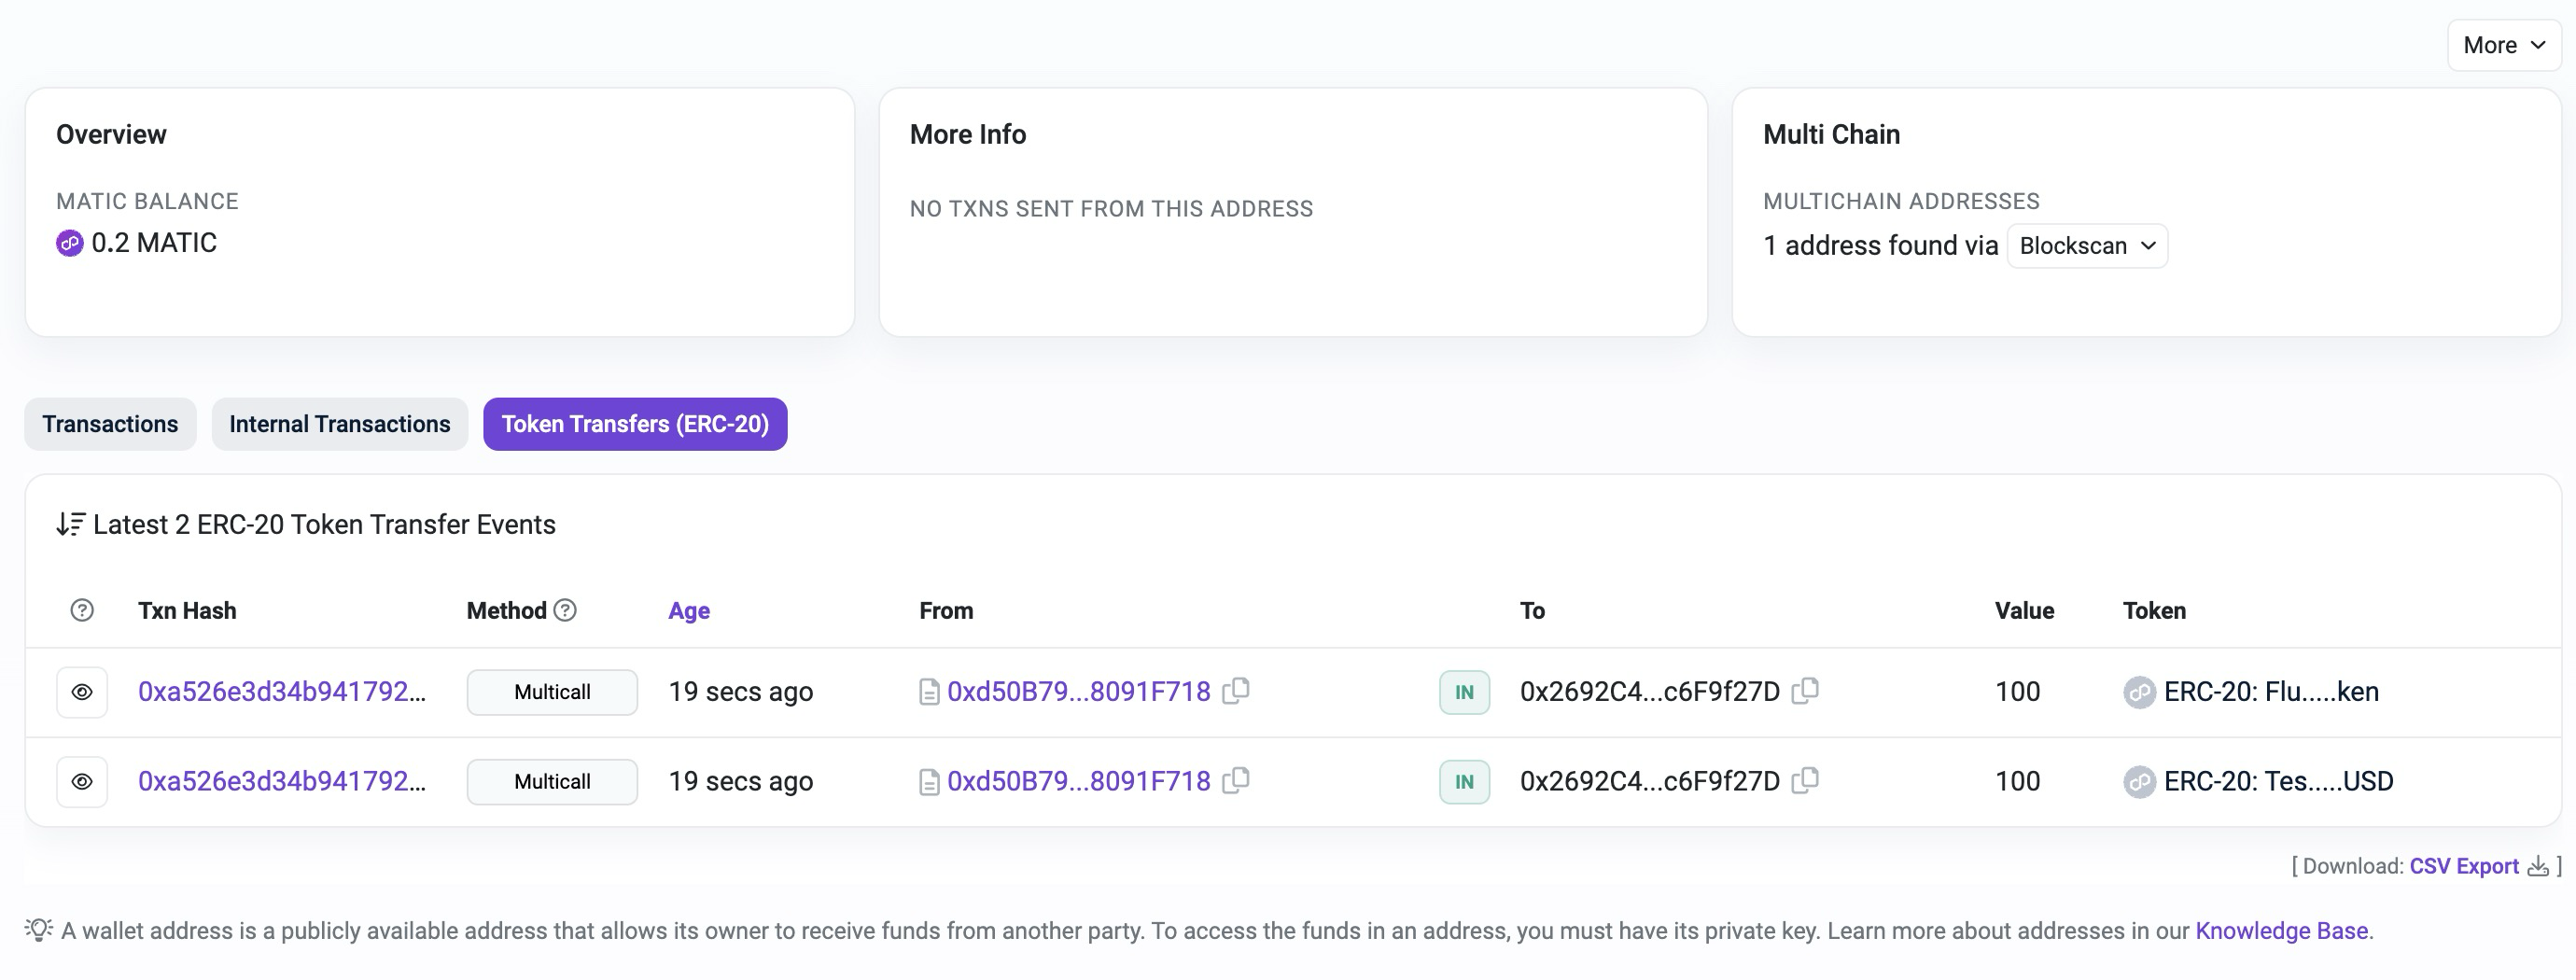
Figure 15: Inspect Transfers via Polygon Explorer
Now, we're ready to talk about Deal deployment and Compute Marketplace.
Compute Marketplace: Glossary & Background
Fluence is a decentralized, permissionless peer-to-peer protocol that makes a Decentralized Cloud where developers can deploy their WebAssembly functions and pay with tokens for their execution. Payments go to Providers, who host these functions.
While the execution of business logic is off-chain, the market-making and associated settlement is on-chain. Specifically, a set of smart contracts handles the agreement over things like payment and collateral between a Developer and one or more Providers that would host and execute specified functions.
What are deals
Deal represents a request from Developer to host a set of WebAssembly functions for a specified price. Providers are able to join these deals in order to host functions and receive tokens for that.
In essence, Deal specifies what to deploy, and how much to pay for that.
Among parameters described above, each Deal specifies an AppCID. AppCID is an IPFS CID that points to the Worker Definition data structure stored on IPFS.
Where Worker Definition comes from
As we will see in step-by-step section below, there's a certain structure to the Fluence Projects. That structure is defined by fluence cli tool, which provides means to initialize and maintain Fluence Projects.
Fluence Project can hold any number of Rust and WebAssembly -based functions and timer-based recurrent Aqua scripts.
A set of functions defined by a single Rust project or a set of linked WebAssembly modules is called a service.
A timer-based recurrent Aqua scripts are called Spells. It's like a cron, but for distributed choreography.
Developers can group Services and Spells to Deals, and then deploy each deal via fluence deal deploy command in fluence cli. Before Deal is registered on Chain, its settings and artifacts are uploaded to IPFS to produce Worker Definition, which is again stored on IPFS to produce AppCID.
How deals are matched
In order for a Deal to be deployed, there should be Providers willing to host it. That process is governed by the Matcher smart contract.
Optionally, Deal can specify Providers on which to deploy. However, by default, Providers are chosen automatically.
It's important that Matcher makes it possible for a single Deal to be deployed on several hosts to provide High Availability.
A Deal specifies different parameters, like price per epoch, minimum collateral, effectors and target number of workers.
These parameters are matched against Providers' Market Offers, which specify minimum price per epoch, maximum collateral and available effectors.
Providers register their Market Offers on chain in a contract called Matcher, and each deal deploy calls that contract to find Offers compatible with that Deal. It should match the price, collateral and available effectors.
Each match should find at least target number of workers Providers whose offers are compatible with a given Deal.
After match happened, Providers receive an event from Chain that commands them to deploy Deal to their chosen Compute Peer.
What are Compute Peers
In order to actually host Services and Spells from Deals, Provider have to run instances of a Fluence-developer Peer implementations.
At the moment, there are two Peer implementations: one in JS, another in Rust. The latter one is called Nox, and it plays the role of a Compute Peer.
While Provider is a rather ephemeral entity, defined only by its Wallet keys, the Compute Peers are the actual instances of Nox that host Deals.
Compute peer host Services and Spells from assigned Deals. Services and Spells of the same Deal are grouped into a Worker, thus completely separating business logic of different Deals, allowing them to safely co-exist on a single Compute Peer.
What are workers
When Deal is matched against Market Offers, it gets deployed to a number of Compute Peers.
For every deal, a Compute Peer creates a secure namespace to isolate functions of that Deal from other Deals. That secure namespace is called a Worker. After successful deployment, a Worker holds all Services and Spells.
Since Workers are isolated from each other, Service and Spells names and aliases will never have a collision with Services and Spells in other Workers.
In order to reach these Services and Spells and call functions on them, it's required to know two things: Compute Peer ID and Worker ID.
For purposes of this document, it's enough to know that a Worker is what holds a set of Services and Spells for a single Deal.
What are subnets
Subnet is a set of Workers each hosting Services and Spells from the same Deal.
It's important to diversify where Deal is hosted to provide High Availability. So Workers of a single Deal will always be on different Compute Peers, and most likely these Compute Peers will come from different Providers.
So, Subnet unites one or more Compute Peers of one or more Providers. A single Subnet corresponds to a single Deal, so each Compute Peer of a Subnet hosts a Worker which contains all the Services and Spells defined by the Deal's AppCID.
Information about Subnet participants is stored on Chain. So it's a public information that's easy to retrieve from Chain knowing a Deal ID. Clients use that information to resolve Subnets to a list of Workers, and access Services and Spells inside these Workers.
Deployment to the on-chain marketplace
Deal deploy
fluence deal deploy will deploy all deals defined in fluence.yml.
See fluence deal deploy --help for information on more settings to deal deploy command.
As deployment happens through blockchain, you will be prompted to open a URL to sign Transaction with your Metamask wallet. You will have to do that twice.
First, you will see this message in your terminal:
Open it, and connect Metamask. After a short while, you will see a Metamask prompt to sign Transaction.
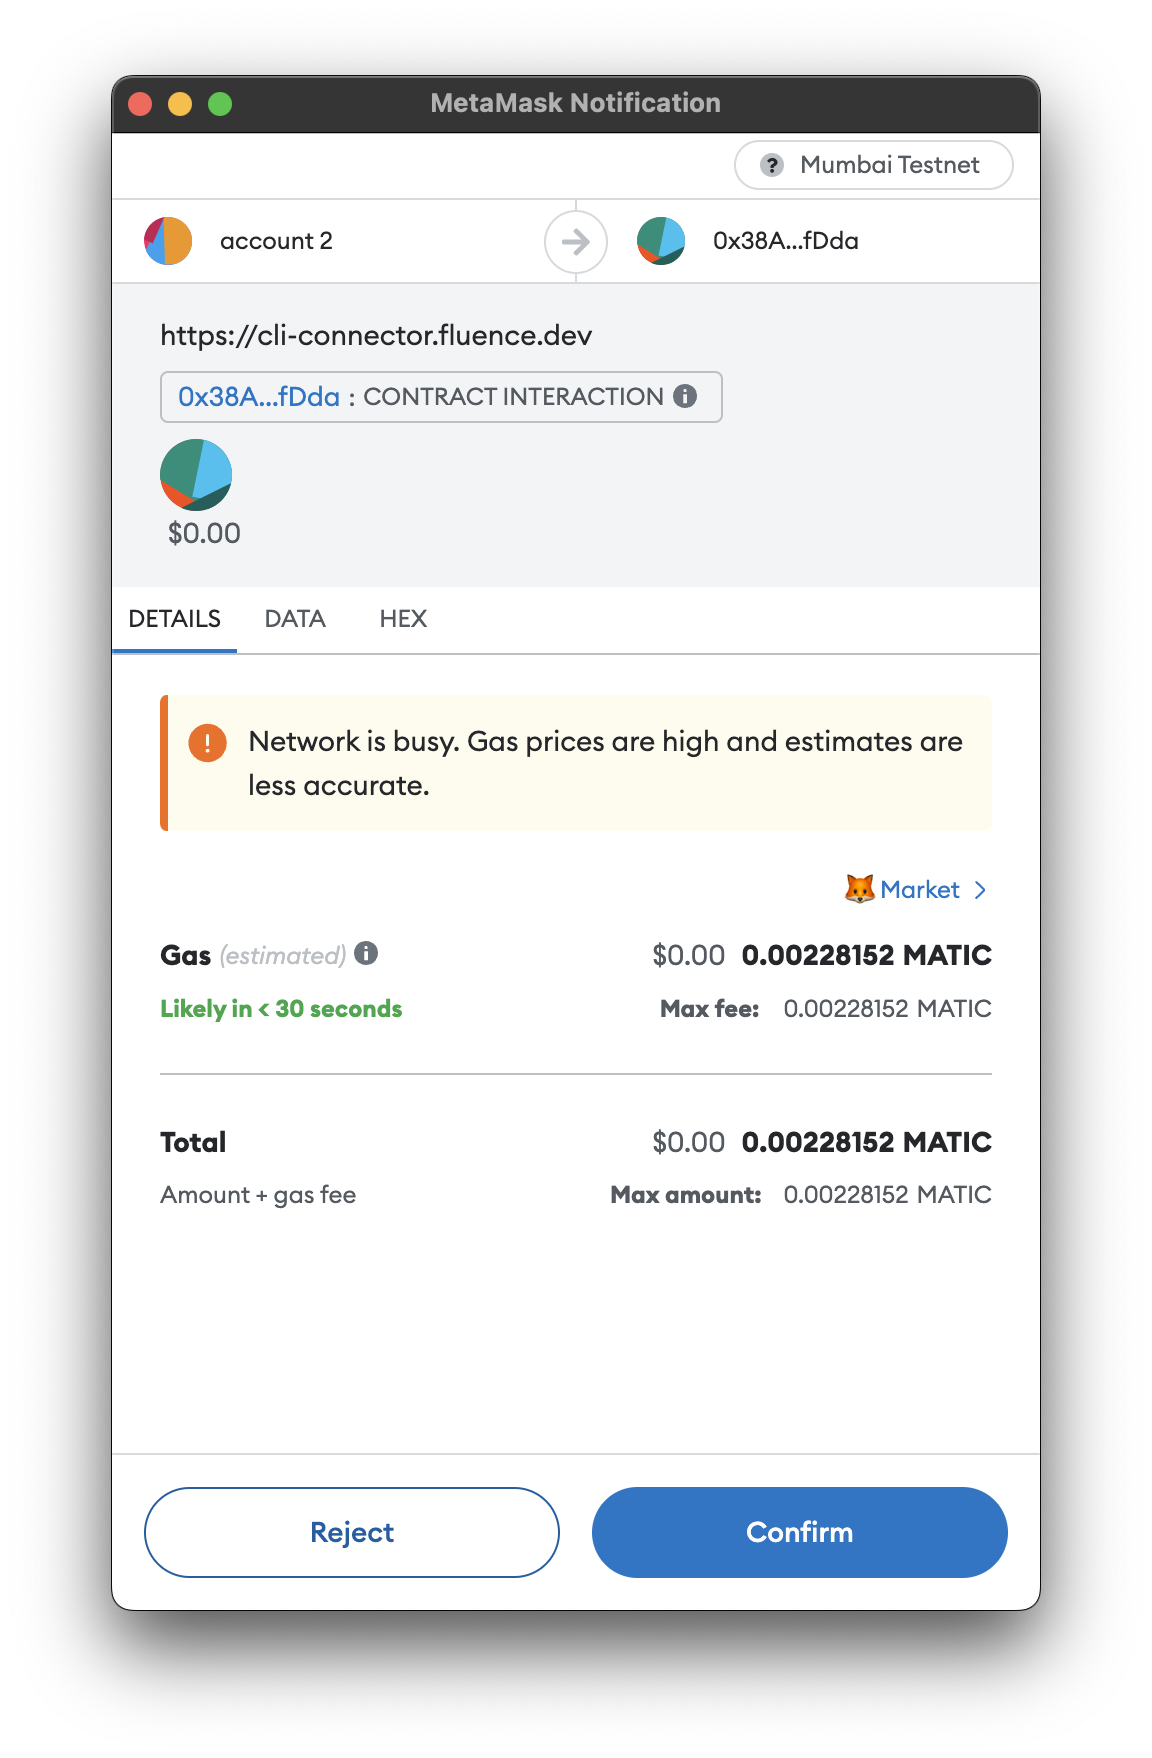
Confirm TX with MetaMask
After you have approved the tx, a similar message will appear, and you have to do open second address, and repeat same actions with metamask as before.
After a short while, you will see a message like this one:
That means your Deal was deployed successfully. After a short while, Providers will catch up and deploy it.
Call a function over the subnet
In your project, there's a file src/aqua/main.aqua which contains the function runDeployedServices which resolves a Subnet and calls a function on each of the Workers in the Subnet.
However, since we have started with a minimal template, this function is commented.
Uncomment it, and then change the service function call that's written to answer variable.
Change these two lines:
aqua
aqua
To this
aqua
aqua
Let's go through the two changes:
- Type name of the service was changed from
MyServicetoHelloWorld. Service types are imported from.fluence/services.aqua, which is generated by Fluence CLI onfluence buildandfluence deal deploy. - Instead of
?[answer], it is now?[answer.response]. That's becausehello_world()function returns not just astring, but a data structureHello, which contains fieldresponse. Alternatively, you could change the definition ofAnswerdata structure to holdHelloinstead ofstring.
Now, to run the updated Aqua function, simply run the following command:
bash
bash
You will see a list which may not contain any data and the associated worker_id is null. That means that this specific Compute Peer has not deployed the Deal ... yet! Wait a bit, where bit = blocktime + some additional patience stressor, and re-run the command.
Inspect a deployed deal
The main.aqua file contains another commented function, called showSubnet. Just uncomment it, and you're good to go.
bash
bash
json
json
Update deal
Now, if you want to change something in one of your Services or Spells, you can do that, and simply call deal deploy again will update existing Deal in place.
Try it: modify code in src/services/hello_world/modules/hello_world/src/main.rs and execute deal deploy again.
Current limitations
Right now, there's no way to remove a Deal once it is deployed. It will be possible shortly!
Also, there's no billing yet, so you won't be charged any tokens and Deals will remain deployed forever. That will be fixed soon, as well.
Consider reading: Keys management with Fluence CLI